Ukulele Chords

How to Read and Play Ukulele Chords: Soprano, Concert, and Tenor

If the ukulele is your first instrument, learning it can be overwhelming at the start. Ease into it with this guide on how to read and play ukulele chords.

There are literally hundreds of basic ukulele chords to choose from. If you’re a newbie, that probably sounds overwhelming. Learning an instrument is rewarding but also comes with a fair share of frustrations. Sometimes it may even feel like you’ll never get better.

Did you know it only takes 20 hours to learn anything? This won’t make you a uke virtuoso but you will be able to have fun and play your favorite songs. The key is to break the complexities down into bite-sized pieces.

Keep reading to discover some pretty cool ukulele chords and how to harness their island magic. (That means “play them,” for all you serious types!)

Ukulele Chord Basics


First things first.

If you’re going to play the ukulele, you need to know the basics. Most information you see online will be for the soprano, concert, and tenor ukuleles. This is because they all use the same traditional tuning.

The strings are illustrated as vertical lines (from left to right standard G C E A string) and the frets are the horizontal lines.

String notes from ceiling to floor:

  • G string – 4th string (top string)
  • C string – 3rd string
  • E string – 2nd string
  • A string – 1st string (bottom string)

Notice the little “g” for the first string. Many ukuleles are in tune with what’s called “re-entrant tuning.” This means the fourth string isn’t the lowest note. This high “g” lies between the E and A on the scale.

Some people prefer a linear tuning method. Linear tuning uses the “G” tuned an octave down. This makes it the lowest note on the uke and fills out the bass sound.

You will need special strings to tune your ukulele in this way. If you want to learn some sweet ukulele songs, proper tuning is a must.

Example songs that would be best for Ukulele are:

  • Adele – Someone Like You
  • Train – Hey, Soul Sister
  • Jason Mraz – I’m Yours
  • Vance Joy – Riptide

Frets

Frets are the spaces between the vertical lines along the neck of your ukulele. By holding down the strings near the fret bars and some strumming patterns, you produce a tone. This is called “fretting.”

The number of frets your ukulele has depends on what size instrument you have.

Bad pun time: Don’t you fret, learning an instrument makes you smarter!

Reading Chord Diagrams

Chord Diagrams

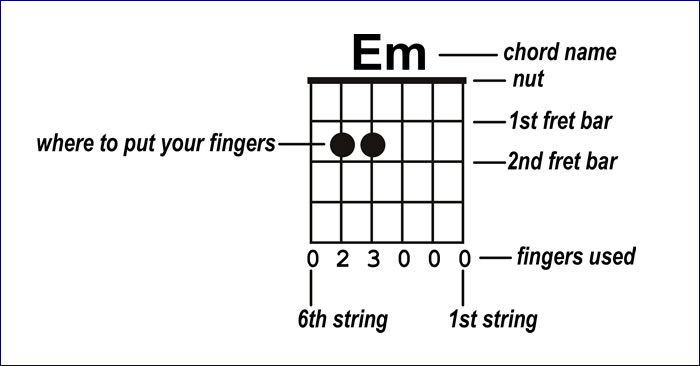
Reading chord diagrams can be confusing for beginners.

Most chord diagrams you come across will be a display of the uke upright and held out in front of you. The “g” will be to the left and the “A” to the right.

A chord diagram displays the four strings and the first four frets of the ukulele. The fretted notes are displayed as black dots on the diagram. At the top of the diagram, you will see the chord spelling and small circles or “X’s.” A dot on the string means this should be fretted, or pressed down to the fretboard using a finger.

The small circles look like the letter “o.” They indicate strings that aren’t fretted and played “open.”

Occasionally you will see little “Xs.” These mean don’t play (mute) that string.

Ukulele Chords

Ukulele Chords

Chords are three or more notes played at the same time. They turn simple melodies into memorable songs.  Some of the most common chords in popular music are C Major, A Minor, F Major, G Major, D Major, and E Minor.

“Major” and “minor” refer to the quality of sound.

A common cliche is that major chords sound happy and minor chords sound sad. This is not always true.

Major and minor chords are simply different colors for your paintbrush. What matters is how they’re used.

When playing chords, a good rule of thumb is one finger per fret. For example, use your second finger (the middle finger) on the second fret.

C Major (C or CMaj)

The C chord is probably the easiest chord to play on the ukulele.

To play the C chord, place your third/ring finger on the third fret of the first string. Play the other three strings open. Rest your finger right in front of the fret bar without touching it.

You should get a clear tone as you strum straight down.

A Minor (Am or A-)

To play the Am chord, place your second/middle finger on the second fret of the fourth string. Play the rest of the strings as open.

F Major (F or Fmaj)

To play this resonant chord, place your second finger on the second fret of the fourth string. Your first/index finger goes on the first fret of the second string.

Gmajor (G or Gmaj)

To play this chord, place your first finger on the second fret of the third string. Your second finger goes on the second fret of the first string. Your third finger goes on the third fret of the second string.

The G chord can make your fingers feel a bit squished. Roll your fingers around until all notes sound clear. Make sure you aren’t accidentally muting any strings with a fretting finger.

D Major (D or Dmaj)

You can play the D chord with two methods. First, you can barre your first or second finger on the second fret of the fourth, third, and second strings.

A barre is using one finger to fret multiple strings at a time. It can be a bit challenging for complete beginners. If this is the case, stack your first, second, and third fingers on the second fret of the fourth, third, and second strings, respectively. As your fingers build strength, you’ll be able to use either method effortlessly.

E Minor (Em or E-)

To play Em, start by placing your first finger on the second fret of the first string. Place your second finger on the third fret of the second string. Finally, place your third finger on the fourth fret of the third string.

Play all four strings for this haunting tone.

Strumming

Now it’s time to add some rhythm.

A song is a combination of tones and rhythms. When you play your uke, the tone should be strong and resonant.

With your thumb, strum down from the fourth to the first string. Apply enough force to produce a loud tone. This is the force you should use while strumming.

Hold your fingers as if you are pinching pennies to buy your very first ukulele. With the fleshy parts touching, your thumb should be perpendicular to your index. You will strum primarily with your index finger. The thumb is for support.

Island stum:

Down-Down-Up-UpDownUp-Down-Down-Up-UpDownUp

Use the fleshy pad of your index to strum the up-strokes. They should be just as resonant as your down-strokes.

Practicing and Getting Good


Practice switching between the ukulele chords. This will build muscle memory which will make your playing easier and faster.

Pick two new chords and set a timer for one minute. Write down how many times you were able to switch between the chords in a minute. This is a fun way to get better at chord changes.

UkuTabs is part of the UkuWorld network which also offers ukulele tips & guides, ukulele scales, chord charts, a ukulele tuner, and much more! It plays along with ukulele music, discovers alternate fingerings – all of these contribute to you becoming a better ukulele player.

Learning an instrument is stress-relieving and makes you just a little cooler. The abundance of knowledge online can be overwhelming. It can also slow your progress.

If you find you’ve hit a wall in your playing, there are plenty of ukulele tabs for these and other songs online and an instructor can guide you down a path to success with its ukulele lessons.

Contact us today for a personalized plan for learning your instrument.


Teach Yourself Piano

Learn How to Teach Yourself Piano at Home | Easy Guide for Beginners

When you’re ready to start learning piano, you may not be ready to start taking lessons right away. Here’s how you can start to teach yourself the basics at home. Eager to start learning piano? Start right at home! Learn how to teach yourself piano with these proven tips and tricks.

With 88 keys to memorize and about 45,000 pounds of tension to deal with, playing the piano is no doubt both physical and mental work. All that hard work is worth it though, once the pianist hits those notes and produces beautiful sounds.

That’s not all that makes piano amazing though. According to a study, learning piano can help boost children’s language skills. There’s also the fact that pianists’ brains have a different (and impressive) brain capacity.

So you want to learn how to teach yourself piano, but don’t know where to start.

Fortunately, you only really need 2 things: a piano, and a willingness to learn. You can worry about things like sheet music later.

The following guide will walk you through the learning process of acquiring, familiarizing, and practicing your piano.

How To Teach Yourself Piano in 10 Steps:

Remember that learning any instrument takes a commitment to practicing regularly. So if you’re ready to learn, and committed to practicing a lot, let’s get started!

1. Get A Piano/Find Yourself a Keyboard

How to Choose a Piano or Keyboard » Buying Guide | flowkey

The obvious first step is to acquire a piano for yourself. Set a budget, do your research on different types of pianos, and look online and in your community for deals.

Some things to consider:

Many music stores rent keyboards. If you want to rent before you’re sure the piano/keyboard is right for you, this might be a good place to start.

If any of your friends or family are involved in the music world, reach out. They may know someone dying to sell an old instrument that isn’t getting used for half what it would cost coming out of a box.

If you’re unable to find a piano, a keyboard is a great alternative. They’re affordable, never go out of tune and have lots of sounds and features that can enhance your music. Not to mention, they’re a lot easier to move around and don’t take up much space. A learning keyboard is a great tool for a beginner. These specialty instruments light up in a specific order to help you learn songs more quickly. Typically, they come with books and videos that will help you learn musical notation. You can always start out on a keyboard and then upgrade to a piano.

Keyboards generally cost less than pianos do. On the plus side, keyboards never go out of tune and take up much less space than a piano will. Wherein, acoustic pianos typically range in price from $2,000 to $10,000 or more for some high-quality concert grand pianos.

2. Get Familiar with Your Instrument

Now that you have your piano or keyboard, spend some time getting familiar with it.

To accomplish this task:

Listen to your new piano. Is it in tune? You might consider having someone tune it for you for the first time. If you went with a keyboard, you can skip this step.

Learn about the keys and their names. If your piano came with a book or you chose to buy one, the keys should be in the piano book. If not, this 5-minute tutorial will walk you through an easy way to learn the keys.

Make sure you understand what proper hand posture looks like. Really listen to each of them, and note how they are different from the others. Keep practicing until you can tell the difference between them. You want to form good habits from the beginning!

3. Train Your Arms and Hands with Proper Positioning


The first step on how to teach yourself to play the piano is to ensure your arms and hands maintain the right-hand position. That’s the “C Position,” which is the natural cupped-shape they form when left hanging to your side. You will also be able to read a selection of notes from both the bass and treble clefs, and you will be able to play some simple piano chords in the left hand.

It’s the same position you need to keep when you put your arms and hands on top of the keys. While doing this, ensure your wrist and forearms remain straight.

Play five-finger patterns all over the keyboard, and in many different keys. Use a lot of black keys! First without notes to learn the geography of the keyboard, and then with notes using “landmark notes” to find your way.

It’s crucial to follow the proper hand and finger positioning since it helps prevent repetitive stress injury. Also, we understand that you’d like to learn how to learn piano fast, but know your limits and don’t over-practice.

4. Know Your Notes

Learning piano means learning a new type of language – that of music. It’s much like how you first learned the alphabet, but in this case, it’s noted that you’ll memorize. With constant practice, you’ll have these committed to memory soon enough.

A good way to start is with the Do-Re-Mi tune (yes, the one from The Sound of Music). Each of these represents a note on the piano, starting with note C. It’ll help you get the notes’ pitch while also learning which keys to press on the piano.

  • Do – Note C
  • Re – Note D
  • Mi – Note E
  • Fa – Note F
  • So – Note G
  • La – Note A
  • Ti – Note B

To locate C, look for a pair of black keys (accidentals). Right to their left is C. There are several Cs on the piano, and they’re always eight notes (octave) apart.

F is another keynote to know the placement of by heart at the beginning. It’s the key to the left of a trio of black keys.

Memorizing your Cs and Fs right away makes it easier to memorize the location of the rest of the notes.

5. Familiarize Yourself with Sharps and Flats


The black keys play either sharps (#) or flats (b). They come in either pairs or trios.

When you see a # on a piece, that means you have to play the next higher key. A b, on the other hand, means you need to play the next lower key.

To start, look at the center of the piano. Do you see that group of one pair of blacks and a group of three? That’s where you’ll find the middle C note.

As mentioned above, all Cs appear to the left of two blacks. F to the left of three blacks. So, these ones you find in the middle of your piano are the Middle C and Middle F.

When you press the black key right above and beside the Middle C note, it produces either a C sharp (C#) or a D flat (Db). The black key beside it plays the D# or Eb. As for the black key beside Middle F, it plays F# or Gb.

Do you see the pattern now? Always remember that black keys are always either sharps or flats, but white keys can also play sharps or flats.

6. Set A Practice Goal

Begin with your end goal in mind. You want to learn the piano, but what do you want to play? How long do you want it to take?

What material will you be focusing on? Is that material online or from a book you bought?

What keys or scales do you want to be able to play? What’s your favorite song that did you picture yourself playing when you first started thinking about learning how to teach yourself piano?

What will you be able to play on the piano in seven days? What about 14 or 30? You are just starting to learn how to teach yourself piano, so you probably don’t need goals beyond a month just yet. Focus on the first 30 days!

How long will you practice each day?

7. Start Practicing

The first three parts were leading to the most important step, which is this: Do you really want to learn how to teach yourself piano? Then practice, every day!

Some tips for your practice sessions:

Stick to your goal. If you need a break from the same few scales or chords, try some finger speed exercises.

Practice chords and scales. These will form the foundation of your piano playing, so be sure to do these each day. Start with the major and minor chords!

Learn the major keys. If you want to eventually play by ear and identify the sounds you make, this is important. Easy songs like “Mary Had A Little Lamb” are perfect for this!

As you start playing by ear, also begin noticing patterns. All songs are composed of musical patterns. You’ll want to start identifying and learning these patterns as you work towards your eventual goal of playing songs on the piano.

The internet can be your friend when you’re ready to learn songs. Many sites will allow you to download some of their sheet music for free!

8. Practice Your Fingers


Now that you’ve got your basics down, next is to apply them with your fingers. This way, you can train your fingers to know right away without fumbling. When you are first learning to play the piano, fingering is key. You must know where your fingers are supposed to go when you are starting to play the piano.

A good place to start is the pentascale approach. Pentascales are any scale that has five (Penta) notes. Since you already know by now where the Middle C is, you can begin your finger practice with the C Major pentascale.

To begin, put your thumb on the Middle C note, index on D, middle on E, ring on F, and a pinky on G. Those five notes make up this pentascale.

This is one of the easiest finger practicing techniques since it trains up all your fingers. Now, you want to start slowly, so apply the whole note approach (count four beats before pressing the next key). From here, you can move on to half notes and then quarter notes.

Once you feel more comfortable, you can move up the practice ladder to taking it two notes at a time. That means using two fingers since you’ll press two keys simultaneously. It’s a bit more complex, but it’ll help you prepare for more advanced pieces.

9. Get Your Timing Right

Every note has a count – the length of time you should keep it pressed. In music sheets, you’ll find three most often used, which include the following:

  • Whole notes (with four beats)
  • Half notes (with two beats)
  • Quarter notes (with one beat)

The white circles you see on a music sheet are whole notes. When you see these, it means you have to keep the note for four full beats (as in one-and-two-and-three).

Half notes are also white circles, with a stem attached to them. You hold these notes for two beats (one-and-two).

Quarter notes look much like half notes, except they have shaded circles. They represent one beat.

10. Play With Other People

After some time, it’s a good idea to find other people to practice around or with.

Ask a more experienced piano player if they want to get together and practice, or if they have any resources that helped them learn.

Once you start making progress, do mini “performances” for people, even if it’s your family. They will be able to tell you what sounds great and what could use a little tweaking.

Last, consider taking piano lessons with a piano instructor. An instructor will give you hands-on coaching, accountability for learning the instrument, and teach you how to correct pacing. Plus, if you teach yourself the basics, a piano teacher will help expedite the process to you playing some simple songs you really want to learn!

One good set that many adult beginners have used is the Alfred Self-Teaching Adult Piano Beginner’s Kit.  While you might only want to learn how to play current popular music, a piano teacher might introduce you to other genres such as classical music or jazz music.

Wrap Up

In truth, playing the piano requires only two things: having the instrument readily available to you, and dedication to the practice.

How to teach yourself piano can be summed up like this:

Begin by setting a budget and find the instrument that is right for you. Then, get familiar with your new instrument.

After you read through and watch tutorials on things scales and chords and finger posture, decide what you’d like to learn, and how quickly. Set a goal for your piano playing!

Last, start practicing — every day if you can swing it. To accelerate your learning, set a goal of playing around people after a couple of weeks. Even if it’s family, it will give you feedback on what you’ve learned and motivate you to keep working.

There are also piano courses and google resources through youtube videos and online courses that can help you to learn how to play the piano.

Want more tips for learning how to play the piano? Whether they’re for adult beginner piano learning or for your little ones, you’ll find more useful posts in our blog!

If we can help you on your journey to learning the piano, from buying a new one to working with a piano teacher, don’t hesitate to contact us. Now, start practicing!


Piano Bar songs

How to Master Piano Hand Position Fast and Easily

Being able to sit down at any piano and play starts with mastering proper piano hand position. Check out these tips to help you practice and perfect your hand positioning.

If you are a beginning baseball player, you need to learn baseball mechanics. To do so, you repeat fielding and hitting drills.

The same is true for the piano. We all want to play beautiful music full of emotion. To do so, however, you must master basic technical skills such as piano hand placement. Without it, you can’t play much of anything, let alone play something beautifully.

Are you a beginning piano player struggling with your piano hand positioning? Would you like to be able to play faster and with more agility?

If so, you’ve come to the right place! We’ll go over basic piano hand placement tips and then show you some exercises to help you improve yours! Read on for more information.

Learn all the scales with proper fingering. Scales are one of the basic building blocks of music, and if you practice scales with proper fingering, your fingers will automatically know where to go when you see parts of a scale in a piece of sheet music.

The Reasons for Working on Your Piano Hand Position


Why do we care about a good piano hand position? Does it really matter? The answer is yes. Below we’ll explore several reasons why.

First, using improper technique creates tension. That doesn’t sound like a big deal, but if you’re practicing and performing with constant tension, it won’t be long before you feel aches and pains. Of course, playing with pain will negatively affect your piano playing and could hurt you.

It’s best, then, to learn proper piano technique, including correct hand position, early on, and continue to use it while you play.

Second, piano teachers don’t want you to use proper hand techniques because they’re trying to annoy you. The truth is, it’s actually easier to play with good technique.

For example, take two pianists. One has worked hard at their hand positioning, and the other hasn’t. No doubt the first player will be able to play not only faster but also more expressively. That’s because they’re not struggling with technical issues like the second one surely is.

For all these reasons, then, it’s a good idea for you to know where to place your hands on the piano keys. In the next section, let’s go over how to place your hands on the piano keys.

Place your right-hand number with one finger (your right thumb) on Middle C. Now place your right number 2 finger (your index finger) on the white note directly to the right of Middle C position. Your left hands and right hands are mirror images of each other, even if they’re moving in different directions or playing different patterns.

Where to Put Your Hands on the Piano: A Small Guide

After all, this, then, how should you place your hands on the piano? The first thing to consider is: how far away are you from the instrument?

It’s common for beginning piano players or piano students to sit either:

  • too close to the piano, or,
  • at the wrong height

Avoid those situations by adjusting your piano bench. The height should allow you to place your arms at a piano level. It’s also okay for them to be a little bit higher than the instrument.

In addition, make sure your piano bench is far enough back. Your elbows need to be in front of you. And, your arms must also extend easily in front of you, with your fingers resting on the piano keys.

It’s important not to collapse your wrists. Instead, hold them steady in a relaxed and comfortable manner.

Finally, allow your fingers to curve slightly over the piano keys. This is one of the best ways to avoid tension. It also allows you to play more efficiently as you progress.

That is a lot to remember, isn’t it? But, there are exercises to help make piano hand position as natural as eating or sleeping. Let’s see what they are in the next section.

Some Basic Exercises to Improve Your Piano Hand Placement

All pianists practice their scales, chords, and arpeggios. Is there anything else you can do, though, to improve your hand positioning?

It turns out there are some standard exercises to help with curving your fingers. They are suitable for musicians of all levels and have the added benefit of being fun.

Play longer keys with your shorter fingers. If you look at the keyboard, you’ll see longer white keys and shorter black keys. Your shortest fingers are your thumb and your pinky(little finger), and typically they will only play white keys and if you’re playing music with sharps or flats, you’ll need to play the shorter black keys with your long fingers.

Play Catch!

In this first exercise, you’re going to use a ball to practice curving your fingers properly. It’s important, though, to use a ball that fits your hand. Either a golf ball or a tennis ball will work, depending on your hand size.

If you have a friend available, have them throw the ball to you. Otherwise, you can throw it up against a wall yourself.

As you catch the ball, curve your fingers only against the top part. Take note of their correct position. That’s how they should curve over the piano keys.

Shake Someone’s Hand Today

It’s possible to do this exercise alone, but it’s better with a partner. What you’re going to do is shake their hand (or, if you’re alone, pretend to shake their hand).

After a bit, let go of your partner’s hand, making sure you keep your hand in the same position. Then, turn your hand over so your palm faces down.

Take note, because this is the hand position you need to use for piano playing. All the basic elements are there:

  • curved fingers
  • firm knuckles (you don’t want them collapsing!), and
  • a C-shape between the thumb and index finger position

After a while, these elements will become second-nature, and you won’t have to go around shaking everyone’s hand any longer.

Have a Drink

This exercise is similar to the preceding one, only you don’t need a partner.

Take a glass, and hold it in one hand. Again, the glass needs to be the right size for your hand. Otherwise, the exercise won’t work. If you need to, experiment with glasses of different sizes until you find one that feels comfortable.

Notice how your fingers curve around the glass. Then, put the glass down, but, again, keep your hand in the same position.

Flip your hand over so your palm faces down, and place it over the piano keys. The result should be a position of your hands that’s pretty close to the one you’d normally use for piano lessons.

Make sure your fingers are curved and take note of the distance between your thumb and index finger.

Conclusion: Piano Hand Placement


Give some of these fun exercises a try. They might be just what you need to improve your piano hand placement. And, you never know, maybe someday you’ll be performing a difficult work like Rachmaninoff’s Piano Concerto No. 3. Why not?

In the meantime, if you are interested in learning more about the piano, check out our blog! It’s filled with articles that are sure to help beginning and experienced pianists alike.

The post Piano for Beginners: Keyboard or Digital Piano? first appeared on Merriam Pianos


2359 Bristol Cir #200, Oakville, ON L6H 6P8
merriammusic.com
(905) 829-2020

Teach Yourself Piano

Learn How to Teach Yourself Piano at Home | Easy Guide for Beginners

When you’re ready to start learning piano, you may not be ready to start taking lessons right away. Here’s how you can start to teach yourself the basics at home. Eager to start learning piano? Start right at home! Learn how to teach yourself piano with these proven tips and tricks.

With 88 keys to memorize and about 45,000 pounds of tension to deal with, playing the piano is no doubt both physical and mental work. All that hard work is worth it though, once the pianist hits those notes and produces beautiful sounds.

That’s not all that makes piano amazing though. According to a study, learning piano can help boost children’s language skills. There’s also the fact that pianists’ brains have a different (and impressive) brain capacity.

So you want to learn how to teach yourself piano, but don’t know where to start.

Fortunately, you only really need 2 things: a piano, and a willingness to learn. You can worry about things like sheet music later.

The following guide will walk you through the learning process of acquiring, familiarizing, and practicing your piano.

How To Teach Yourself Piano in 10 Steps:

Remember that learning any instrument takes a commitment to practicing regularly. So if you’re ready to learn, and committed to practicing a lot, let’s get started!

1. Get A Piano/Find Yourself a Keyboard

How to Choose a Piano or Keyboard » Buying Guide | flowkey

The obvious first step is to acquire a piano for yourself. Set a budget, do your research on different types of pianos, and look online and in your community for deals.

Some things to consider:

Many music stores rent keyboards. If you want to rent before you’re sure the piano/keyboard is right for you, this might be a good place to start.

If any of your friends or family are involved in the music world, reach out. They may know someone dying to sell an old instrument that isn’t getting used for half what it would cost coming out of a box.

If you’re unable to find a piano, a keyboard is a great alternative. They’re affordable, never go out of tune and have lots of sounds and features that can enhance your music. Not to mention, they’re a lot easier to move around and don’t take up much space. A learning keyboard is a great tool for a beginner. These specialty instruments light up in a specific order to help you learn songs more quickly. Typically, they come with books and videos that will help you learn musical notation. You can always start out on a keyboard and then upgrade to a piano.

Keyboards generally cost less than pianos do. On the plus side, keyboards never go out of tune and take up much less space than a piano will. Wherein, acoustic pianos typically range in price from $2,000 to $10,000 or more for some high-quality concert grand pianos.

2. Get Familiar with Your Instrument

Now that you have your piano or keyboard, spend some time getting familiar with it.

To accomplish this task:

Listen to your new piano. Is it in tune? You might consider having someone tune it for you for the first time. If you went with a keyboard, you can skip this step.

Learn about the keys and their names. If your piano came with a book or you chose to buy one, the keys should be in the piano book. If not, this 5-minute tutorial will walk you through an easy way to learn the keys.

Make sure you understand what proper hand posture looks like. Really listen to each of them, and note how they are different from the others. Keep practicing until you can tell the difference between them. You want to form good habits from the beginning!

3. Train Your Arms and Hands with Proper Positioning


The first step on how to teach yourself to play the piano is to ensure your arms and hands maintain the right-hand position. That’s the “C Position,” which is the natural cupped-shape they form when left hanging to your side. You will also be able to read a selection of notes from both the bass and treble clefs, and you will be able to play some simple piano chords in the left hand.

It’s the same position you need to keep when you put your arms and hands on top of the keys. While doing this, ensure your wrist and forearms remain straight.

Play five-finger patterns all over the keyboard, and in many different keys. Use a lot of black keys! First without notes to learn the geography of the keyboard, and then with notes using “landmark notes” to find your way.

It’s crucial to follow the proper hand and finger positioning since it helps prevent repetitive stress injury. Also, we understand that you’d like to learn how to learn piano fast, but know your limits and don’t over-practice.

4. Know Your Notes

Learning piano means learning a new type of language – that of music. It’s much like how you first learned the alphabet, but in this case, it’s noted that you’ll memorize. With constant practice, you’ll have these committed to memory soon enough.

A good way to start is with the Do-Re-Mi tune (yes, the one from The Sound of Music). Each of these represents a note on the piano, starting with note C. It’ll help you get the notes’ pitch while also learning which keys to press on the piano.

  • Do – Note C
  • Re – Note D
  • Mi – Note E
  • Fa – Note F
  • So – Note G
  • La – Note A
  • Ti – Note B

To locate C, look for a pair of black keys (accidentals). Right to their left is C. There are several Cs on the piano, and they’re always eight notes (octave) apart.

F is another keynote to know the placement of by heart at the beginning. It’s the key to the left of a trio of black keys.

Memorizing your Cs and Fs right away makes it easier to memorize the location of the rest of the notes.

5. Familiarize Yourself with Sharps and Flats


The black keys play either sharps (#) or flats (b). They come in either pairs or trios.

When you see a # on a piece, that means you have to play the next higher key. A b, on the other hand, means you need to play the next lower key.

To start, look at the center of the piano. Do you see that group of one pair of blacks and a group of three? That’s where you’ll find the middle C note.

As mentioned above, all Cs appear to the left of two blacks. F to the left of three blacks. So, these ones you find in the middle of your piano are the Middle C and Middle F.

When you press the black key right above and beside the Middle C note, it produces either a C sharp (C#) or a D flat (Db). The black key beside it plays the D# or Eb. As for the black key beside Middle F, it plays F# or Gb.

Do you see the pattern now? Always remember that black keys are always either sharps or flats, but white keys can also play sharps or flats.

6. Set A Practice Goal

Begin with your end goal in mind. You want to learn the piano, but what do you want to play? How long do you want it to take?

What material will you be focusing on? Is that material online or from a book you bought?

What keys or scales do you want to be able to play? What’s your favorite song that did you picture yourself playing when you first started thinking about learning how to teach yourself piano?

What will you be able to play on the piano in seven days? What about 14 or 30? You are just starting to learn how to teach yourself piano, so you probably don’t need goals beyond a month just yet. Focus on the first 30 days!

How long will you practice each day?

7. Start Practicing

The first three parts were leading to the most important step, which is this: Do you really want to learn how to teach yourself piano? Then practice, every day!

Some tips for your practice sessions:

Stick to your goal. If you need a break from the same few scales or chords, try some finger speed exercises.

Practice chords and scales. These will form the foundation of your piano playing, so be sure to do these each day. Start with the major and minor chords!

Learn the major keys. If you want to eventually play by ear and identify the sounds you make, this is important. Easy songs like “Mary Had A Little Lamb” are perfect for this!

As you start playing by ear, also begin noticing patterns. All songs are composed of musical patterns. You’ll want to start identifying and learning these patterns as you work towards your eventual goal of playing songs on the piano.

The internet can be your friend when you’re ready to learn songs. Many sites will allow you to download some of their sheet music for free!

8. Practice Your Fingers


Now that you’ve got your basics down, next is to apply them with your fingers. This way, you can train your fingers to know right away without fumbling. When you are first learning to play the piano, fingering is key. You must know where your fingers are supposed to go when you are starting to play the piano.

A good place to start is the pentascale approach. Pentascales are any scale that has five (Penta) notes. Since you already know by now where the Middle C is, you can begin your finger practice with the C Major pentascale.

To begin, put your thumb on the Middle C note, index on D, middle on E, ring on F, and a pinky on G. Those five notes make up this pentascale.

This is one of the easiest finger practicing techniques since it trains up all your fingers. Now, you want to start slowly, so apply the whole note approach (count four beats before pressing the next key). From here, you can move on to half notes and then quarter notes.

Once you feel more comfortable, you can move up the practice ladder to taking it two notes at a time. That means using two fingers since you’ll press two keys simultaneously. It’s a bit more complex, but it’ll help you prepare for more advanced pieces.

9. Get Your Timing Right

Every note has a count – the length of time you should keep it pressed. In music sheets, you’ll find three most often used, which include the following:

  • Whole notes (with four beats)
  • Half notes (with two beats)
  • Quarter notes (with one beat)

The white circles you see on a music sheet are whole notes. When you see these, it means you have to keep the note for four full beats (as in one-and-two-and-three).

Half notes are also white circles, with a stem attached to them. You hold these notes for two beats (one-and-two).

Quarter notes look much like half notes, except they have shaded circles. They represent one beat.

10. Play With Other People

After some time, it’s a good idea to find other people to practice around or with.

Ask a more experienced piano player if they want to get together and practice, or if they have any resources that helped them learn.

Once you start making progress, do mini “performances” for people, even if it’s your family. They will be able to tell you what sounds great and what could use a little tweaking.

Last, consider taking piano lessons with a piano instructor. An instructor will give you hands-on coaching, accountability for learning the instrument, and teach you how to correct pacing. Plus, if you teach yourself the basics, a piano teacher will help expedite the process to you playing some simple songs you really want to learn!

One good set that many adult beginners have used is the Alfred Self-Teaching Adult Piano Beginner’s Kit.  While you might only want to learn how to play current popular music, a piano teacher might introduce you to other genres such as classical music or jazz music.

Wrap Up

In truth, playing the piano requires only two things: having the instrument readily available to you, and dedication to the practice.

How to teach yourself piano can be summed up like this:

Begin by setting a budget and find the instrument that is right for you. Then, get familiar with your new instrument.

After you read through and watch tutorials on things scales and chords and finger posture, decide what you’d like to learn, and how quickly. Set a goal for your piano playing!

Last, start practicing — every day if you can swing it. To accelerate your learning, set a goal of playing around people after a couple of weeks. Even if it’s family, it will give you feedback on what you’ve learned and motivate you to keep working.

There are also piano courses and google resources through youtube videos and online courses that can help you to learn how to play the piano.

Want more tips for learning how to play the piano? Whether they’re for adult beginner piano learning or for your little ones, you’ll find more useful posts in our blog!

If we can help you on your journey to learning the piano, from buying a new one to working with a piano teacher, don’t hesitate to contact us. Now, start practicing!

Piano for Beginners: Keyboard or Digital Piano?

Playing the keyboard and the digital piano for beginners might seem quite similar but are actually very different. Here’s what you need to know to decide which instrument is right for you.

While a keyboard and piano may seem similar, there are, in fact, many differences between the two instruments. While a keyboard is based on a piano, the instruments take different skills to practice and learn. If you’re a beginner, the learning curve for both instruments is steep, but mastering it is rewarding.

There are many benefits to learning both keyboard and piano, but most students choose to master one or the other. Before deciding which road to take, it’s important to understand what these two instruments are made of and what you can gain from learning to play them.

Read on to find out the key differences between both instruments, and to determine whether it is best to learn keyboard lessons or piano lessons for beginners.

What’s The Difference?

To understand the differences between keyboards and pianos, you must first understand their similarities. In truth, the keyboard was inspired by the piano and has a very similar design. The keys are played in order to create a certain musical sound. Both instruments have the same basic concept.

Their actual compositions, though, are very different. Keyboard keys are played in order to trigger a synthesizer, responding to the keys that are being played. While keyboards are a cost-effective option, they don’t have the same vibe as a piano. This is mainly because of the way a piano is composed.

The piano, while it may not seem like it, is a string instrument. Every time you press down on a key, a small hammer hits a string in the back of the piano to produce sound. This means that even the best piano player must understand how to place pressure on the keys.

The different makeup of these instruments makes it so that each responds differently to pressure. A piano gives a player much more control based on the pressure he gives, especially in terms of dynamics and musicality.

The Benefits of a Keyboard

Keyboard

While the piano is definitely the more notorious instrument-some people even refer to keyboards as the junior pianos-the the keyboard has many benefits in itself. The first of these benefits is the most notorious-price.

The prices of most acoustic pianos start at the low thousands. This in itself can be a huge turn-off for many aspiring pianists. On the other hand, most keyboards will start around $150 and go up to $1000, making the keyboard a better option if you’re not fully committed or don’t have the budget for a digital piano.

The other benefit of the keyboard is the keys. For many younger children learning to play, piano keys are very heavy and adding pressure may be difficult for them. The keyboard is the solution to this. Having a keyboard, with very sensitive keys, allows for anyone of any age to learn to play!

The keyboard synthesizer is also a great opportunity to add different types of sounds to your performance. Many keyboards come jam-packed with different sounds, even jokey tracks, for musicians looking to develop an alternative vibe. It comes with a digital piano music stand which is fairly sturdy, but I had to purchase the adjustable keyboard stand separately for a keyboard piano.

On top of all of this, many modern keyboards are now coming with pressure sensors, so that the simulation of piano playing is even more accurate. This makes the instrument more realistic and harder to learn, thus more rewarding to master.

There are many shortcomings when comparing a keyboard to a piano, though. Because the pressure controls aren’t fully developed, an artist can’t fully control the music he/she creates with a keyboard. On top of that, the keyboard is not held in the same esteem as a piano.

Either way, the keyboard is a great stepping stone for many young pianists on the way to learning the piano. The key difference is, though, that the keyboard is also a great instrument in itself, and is beginning to command the respect it deserves.

The Benefits of Digital Piano

Digital Piano

The piano is a legendary and beautiful instrument, and many experts argue that its impact could not be matched by a keyboard. No electronic sound, they say, will ever match the beauty of that hammer striking down on piano strings and creating wonderful sheet music that has been enjoyed by many generations.  Which basically composes simple 3-note piano songs set around Middle C; one for the left hand, and one for the right hand, that also includes scales, rhythmic concepts as well as tips on good piano technique like fingering and legato. Okay, we’ve talked about notes and keys on your piano. But unless you want to just plunk out popular songs one note at a time (hint: nobody wants this), you need to learn more about piano chord progressions and what piano chords are. Three popular piano chords – the A minor chord, F major chord, and G major chord.

Three interactive exercises are part of this lesson so that you learn and practice the chord fingering for each one, concluding in playing a famous pop song. And most traditional piano teachers teach you to play them by looking at sheet music, figuring out the notes within each chord as they appear, and playing them in your left hand or right hand depending on whether they are in the treble clef or bass clef.

My approach is all about helping my students learn to build chords – groups of notes that sound good together and add depth to your playing.

Whether you agree with this statement or not, there are too many benefits of learning piano to count. The piano is a well-respected and famous instrument amongst any social circle, and mastering it can truly improve your standing amongst your peers.

The piano is not just a social tool, though. Learning to play piano also does much in sharpening intellect. In fact, understanding music and the control that the piano requires also aids in other areas. For example, regular piano practice at a young age helps to develop the spatial-temporal ability, which aids in math and logic problems.

On top of intellect, the piano is also a physically demanding instrument. Playing it is a workout in itself! With the weight of the keys as well as the proper posture that piano players must master, piano players, are strengthening their bodies while they sharpen their minds with the instrument.

Of course, playing the piano isn’t always easy. The biggest roadblock for aspiring pianists is often cost-pianos start at a high price and there’s no way around it. On top of that, one must dedicate a lot of time and energy to mastering the piano, and there is truly no way around that.

There is nothing wrong with choosing the beginner pianos. If you can dedicate the time, effort, and money to it, the benefits that come with the digital piano are seemingly endless!

Should You Choose Keyboard or Piano for Beginners?


While both instruments may seem similar, the keyboard and the piano are both amazing choices because of their differences. When choosing whether to play a piano keyboard or piano for beginners, there are many things you should consider.

For some, a keyboard is a great option in itself. For others, it is a stepping stone to the piano. Yet, others choose to dive straight into piano-playing and never look back. Regardless of which option you want to choose for a piano beginner in your life, be sure to contact us for any and all your music needs!


The post Piano for Beginners: Keyboard or Digital Piano? first appeared on Merriam Pianos

A Musical Introduction to the Different Types of Clarinets

The clarinet is used across a wide range of musical styles from classical to rock. There are a few types of clarinets available, find out about them here.

Around the late 17th century, Johann Denner invented the first clarinet. Inspired by an instrument called a chalumeau, Denner crafted the clarinet we recognize today.

Since then, clarinets have gone through a number of changes and styles. Certain types of clarinets have become obsolete over time as the preferences of musicians and composers change.

This woodwind instrument appears in chamber music, classical, band, and even jazz. The complete range of a clarinet is the widest of any woodwind instrument. This makes it a valuable addition to any ensemble.

Did you know there are many types of clarinets available today?

The clarinet is a flexible instrument that plays a major part in a number of classical pieces. Its unique sound makes it a great instrument to listen to for music therapy, as well.

If you’re curious about the different types of clarinets, read on to discover more.

Commonly Used Clarinets

These are the widely-used types in the clarinet instrument family today. These clarinets are the most functional and used in a variety of musical styles including classical and jazz.

B-flat and A clarinets are currently the most popular due to their flexibility and sound. These are likely the two types with which you are most familiar. They both made of two constituent parts, the upper joint and lower joint

These are the clarinet types that you will most commonly see used in the most popular clarinet works.


1. B-Flat Clarinet

B-Flat Clarinet

This is the most commonly used clarinet sometimes known as harmony clarinets. Used in different types of music from classical to concert band, this type is what most people picture when they hear a clarinet.  Bb clarinet is one of the best choices for beginners and young clarinet players.

This Clarinet is a grenadilla wood model featuring silver plating and a cylindrical bore with high quality design that makes it easy to keep in tune.

Also recognized as one of the soprano clarinets, it was used often in jazz and swing. Popular clarinetists that used a B-flat clarinet include American jazz artists like Woody Herman.


2. A Clarinet

A Clarinet

Another soprano clarinet, this type of woodwind instrument is also commonly used. This transposition instrument is a bit larger than the B-Flat clarinet.

Some clarinetists claim that the A clarinet has a more delicate sound, but the difference is very slight.  This clarinet is suitable for a more advanced player or professional player. It has a rich sound and is usually played in orchestras and chamber music.

The A clarinet, or soprano clarinet in A, is an A transposing instrument. It’s the only common clarinet that is not in Bb or Eb and it’s slightly larger than the Bb clarinet but can be used in certain classical music situations as an alternative to the Bb clarinet. It has a slightly different timbre.


3. E-Flat Clarinet

E-Flat Clarinet

This is a small clarinet that has a higher pitch, sometimes even shrill. While used in some pieces that need a bright sound, this instrument appears more in college-level or higher ensembles.

Also called sopranino in Eb Clarinet, this type of clarinet often assists the piccolo. It is not an easy variation to play and often requires re-tuning.


4. Alto Clarinet

Alto Clarinet

Much larger in size, this type of transposing clarinet has a low pitch and a distinctive bend shape. The alto clarinet is similar in pitch and appearance to the basset horn.

While used in concert bands or symphonic bands, the alto clarinet is rarely used in an orchestra. It doesn’t project as much as a bass clarinet although it works well in clarinet choirs.


5. Bass Clarinet

Bass Clarinet

This particular type of clarinet was popular with composers like Wagner. Its rich sound plays a key part in a variety of musical pieces from orchestral to concert bands and jazz.

The bass clarinet is much larger than some other types, and also has a distinct bend in the barrel. The large size and weight make this an instrument that requires a strap to play.


6. Contrabass and Contra-Alto Clarinets

Contrabass Clarinets

Contrabass and contra-alto clarinets are one of the largest clarinet types in the family. A contrabass clarinet has several bends in its shape and can measure over seven and a half feet.

The contrabass clarinet is not commonly used, although its unique sound works well for special effects and in clarinet choirs.

A contra-alto clarinet also has a deep, rich sound. It is not often used in an orchestra but makes an appearance in clarinet choirs and bands.


Less Common Types of Clarinets

Certain types in the clarinet family have become obsolete over the years. They are either uncommon or rarely called for in musical compositions.

The clarinet has undergone many changes over the years, but it has played an important part in music history.


1. Basset Clarinet

Basset Clarinet

Used for classical music, the lesser-known basset clarinet in A can also reach a low C. It plays an important part in Mozart’s compositions.


2. Basset Horn

Basset Horn

The basset horn in F is another of Mozart’s favorite instruments and works well in classical music although it is rarely used now. Over the years it has changed from a curved to mostly straight design.


3. C Clarinet

C Clarinet

This instrument lost favor with clarinetists who preferred the B-flat clarinet. Also known as a soprano clarinet in C, it used to be very popular until composers turned towards instruments with a deeper sound.


4. D Clarinet

Sometimes called the sopranino clarinet in D, this instrument was once used in Stravinsky’s composition The Rite of Spring. Although now, this particular clarinet isn’t often played.


5. Piccolo Clarinet

The A-flat piccolo clarinet has a very high pitch that exceeds even the E-flat clarinet. It is a very small clarinet. In fact, it only measures a little over a foot long.

While once used in Italian military bands, it is now rare and mostly obsolete.


Octo-Contrabass and Octo-Contra-Alto

The octo-contrabass is the biggest and heaviest clarinet. It is one octave below a regular contrabass clarinet.

The octo-contra-alto clarinet is smaller and its pitch is one octave lower than the normal contra-alto clarinet.

Considering the large size and extreme rarity of these two types of clarinets, it is unlikely you will ever see or hear one in person.

What the Clarinet Teaches Us About How Music Changes over Time


Clarinets are a recent addition to the musical instrument world. Some types of clarinets are rare and produce a very specific sound while others are versatile enough for almost any music.

From the B-flat clarinet to the experimental octo-contrabass, the clarinet has many uses and an impressive range.

Certain clarinets have gone out of style as music tastes have shifted, but some are gaining popularity once more. This tells us that the clarinet has definitely earned a spot in music of all kinds.

You can contact us or visit our location if you’re thinking about picking up a clarinet for yourself. Bb clarinet is one of the best choices for beginners and young clarinet players.is a grenadilla wood model featuring silver plating and a cylindrical bore design that makes it easy to keep in tune.


The post A Musical Introduction to the Different Types of Clarinets first appeared on Merriam Pianos